Out of Tree NAU7802 Zephyr Driver
Zephyr’s sensor API can be incredibly powerful once you wrap you head around it. It allows you to abstract away the nuances of a specific peripheral giving you familiar code across a broad range of drivers. But, things start to become a bit complicated when a driver isn’t provided for you “in-tree”. In this example, I’ll talk about how to develop an “out of tree” driver using the NAU7802 ADC driver as a starting point.
Project structure
If you’re diving into the world of custom Zephyr driver development, you have two options:
- You can put the driver into it’s own repository then pull it into your project using west .
- Or you can put the driver alongside your freestanding app.
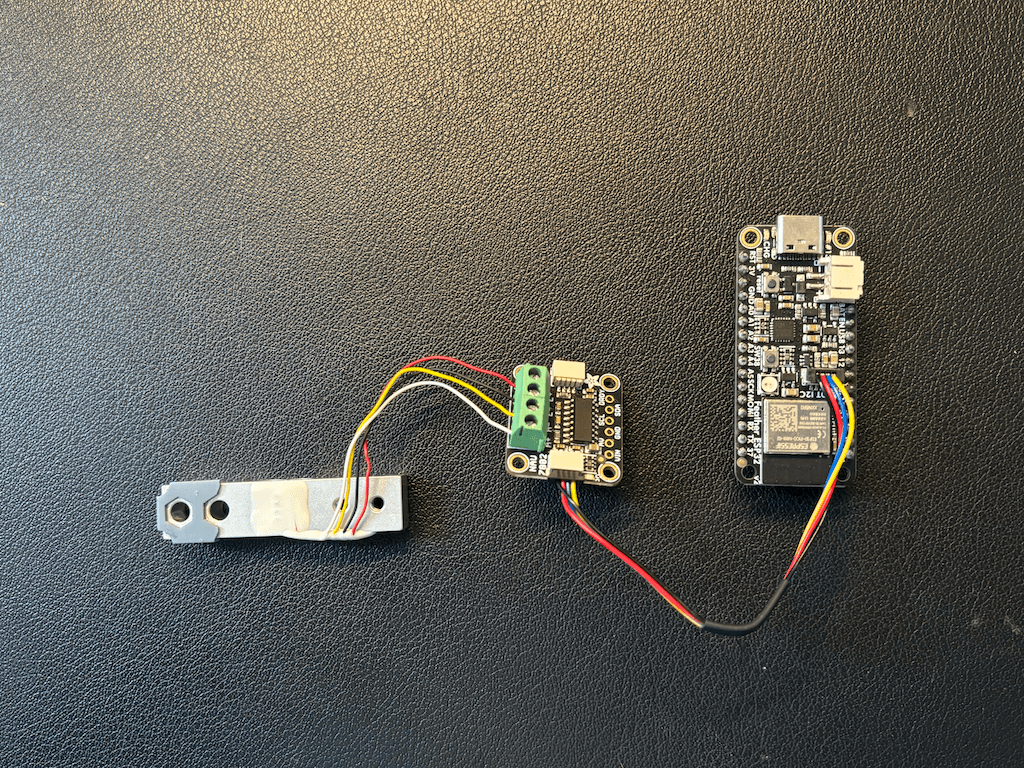
For this post, I’ll use option 2 and keep the driver code alongside of our freestanding app. I’m using Adafruit’s Feather ESP32 V2 and NAU7802 breakout with vanilla Zephyr , but it can be easily adapted to other boards.
The driver code is borrowed from this repository by TinNotTim .
Device tree definition
For this, you’ll first need to define a DTS binding for your device. If moving forward with option 2 (from above), this will go into the root of your application under: ./dts/bindings/sensor/nau7802/nuvoton,nau7802.yaml . It’s conventional to name the .yaml file with manufacturer followed by the part number. This file defines the device tree properties for the device.
An example entry in nuvoton,nau7802.yaml defines the gain property:
gain:
  type: int
  default: 1
  description: |
    ADC gain factor. The default value is x1 at power on.
  enum:
    - 1
    - 2
    - 4
    - 8
    - 16
    - 32
    - 64
    - 128
This can then be used in your overlay file as follows:
nau7802: nau7802@2a {
    compatible = "nuvoton,nau7802";
    reg = <0x2a>;
    drdy-gpios = <&gpio0 1 GPIO_ACTIVE_HIGH>;
    conversions-per-second = <320>; //SPS
    gain = <128>; // <- gain setting
};
Driver code
In the ./drivers folder we have a Kconfig and a CMakeLists.txt file. The Kconfig file contains the following, which will inject the child Kconfig settings defined at sensor/Kconfig into the Kconfig.
menu "Drivers"
rsource "sensor/Kconfig"
endmenu
The ./drivers/CMakeLists.txt file indicates that everything in the ./drivers/sensor/ subdirectory should get built if CONFIG_SENSOR is enabled in prj.conf .
add_subdirectory_ifdef(CONFIG_SENSOR sensor)Now we go one level down into the ./drivers/sensor directory where we have another Kconfig CMakeLists.txt pair. The same concept applies here, we’re telling the build pipeline information about the contents of our child directories.
In ./drivers/sensor/Kconfig , there’s just one line:
rsource "nau7802/Kconfig"This indicates that ./drivers/sensor/nau7802 should be loaded into Kconfig. If you need multiple out of tree drivers, you’d have multiple lines here pointing at different child directories.
./drivers/sensor/CMakeLists.txt once again just tells the build system to add the nau7802 subdirectory if CONFIG_NAU7802 is enabled.
Finally, in the ./drivers/sensor/nau7802 directory we have our last pair of Kconfig and CMakeLists.txt files. This is the Kconfig file that actually defines our ADC properties. For example, the option to enable trigger mode:
choice NAU7802_TRIGGER_MODE
	prompt "Trigger mode"
	default NAU7802_TRIGGER_GLOBAL_THREAD
	help
	  Specify the type of triggering to be used by the driver.
In ./drivers/sensor/nau7802/CMakeLists.txt we establish the Zephyr library and include the driver’s .c files in the build.
zephyr_library()
zephyr_library_sources(nau7802.c)
zephyr_library_sources_ifdef(CONFIG_NAU7802_TRIGGER nau7802_trigger.c)
There’s one last file in our ./drivers directory that helps configure our out of tree driver. The ./drivers/zephyr/module.yml file tells the build system that this directory should be treated as a Zephyr module and points to the relevant Kconfig and DTS definitions we described above:
name: NAU7802_LOADCELL
build:
  cmake: .
  kconfig: Kconfig
  settings:
    dts_root: .
Project configuration
Now we can start implementing the ADC driver in our application code. The first step is to tell Zephyr to add the drivers directory as an extra module in CMakeLists.txt
list(APPEND ZEPHYR_EXTRA_MODULES "${CMAKE_CURRENT_SOURCE_DIR}/drivers")We can enable the NAU7802 and SENSOR flags that our driver relies on in prj.conf :
# Sensor
CONFIG_SENSOR=y

CONFIG_I2C=y
CONFIG_SPI=y
CONFIG_NAU7802=y
CONFIG_NAU7802_TRIGGER_NONE=y
And tell our application’s Kconfig to include the drivers directory:
rsource "drivers/Kconfig"In your board overlay , add an device tree entry for your specific board that enables the nau7802 node. We’ll add it to the I2C node for this example:
&i2c0 {
    status = "okay";
    nau7802: nau7802@2a {
            compatible = "nuvoton,nau7802";
            reg = <0x2a>;
            drdy-gpios = <&gpio0 1 GPIO_ACTIVE_HIGH>;
            conversions-per-second = <320>; //SPS
            gain = <128>;
    };
};
Testing
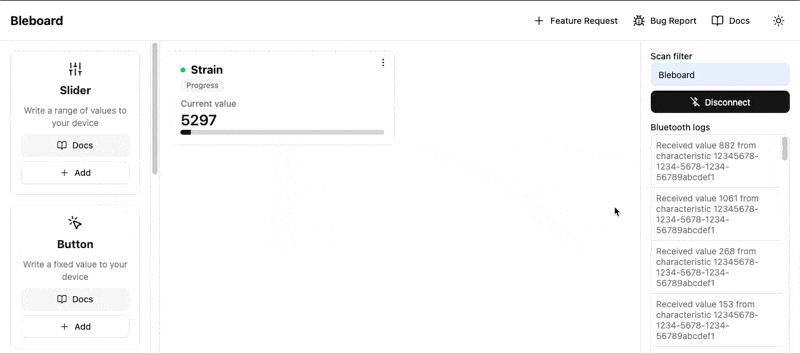
Create a new progress component on dashboard.bleboard.com and configure it as follows:
Remember the driver outputs newtons by default, so the range will be large.
- Service UUID:
12345678-1234-5678-1234-56789abcdef0 - Characteristic UUID:
12345678-1234-5678-1234-56789abcdef1 - Minimum: 0
- Maximum: 100000
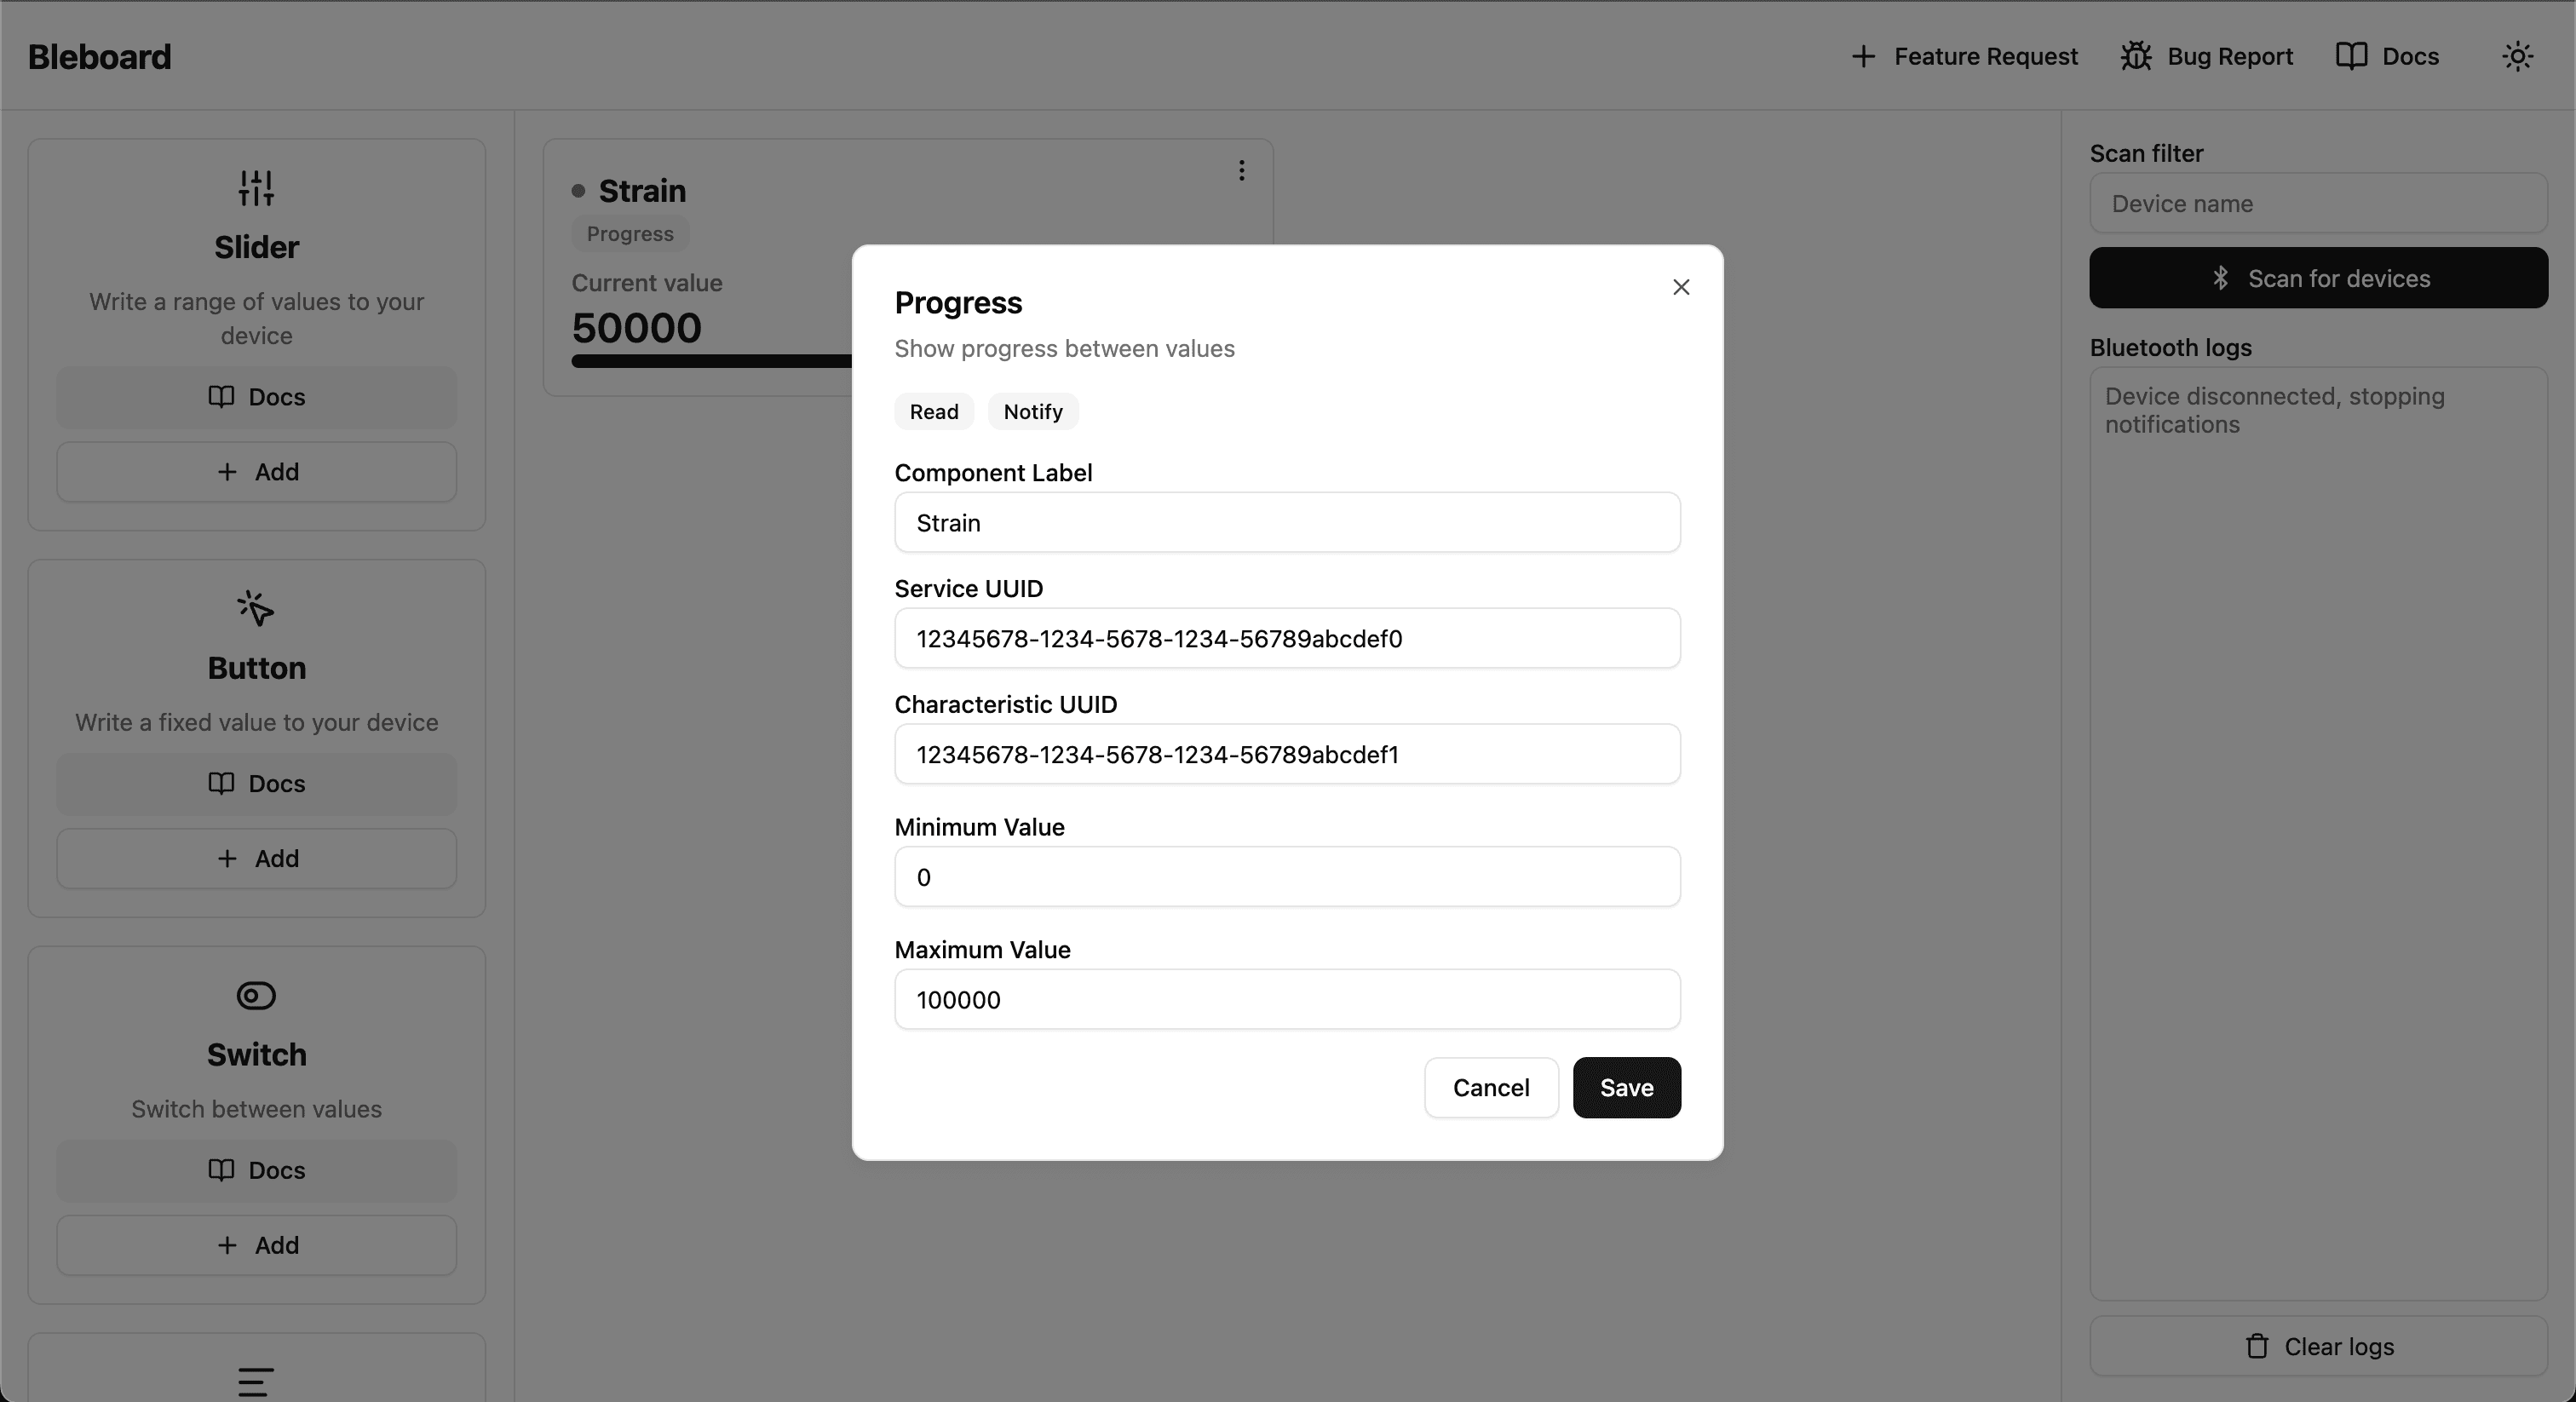
Once you’ve connected to the device and start to manipulate the load cell, you’ll see the progress bar track with the output!