How to flash a Zephyr project without a programmer using a UART to Serial converter
The hope is that I will not have to carry around a programmer and instead can use the UART to serial converter for both programming and serial log output.
I should mention that you will need a programmer (from a dev kit, or elsewhere) to flash the blank chip. The first flash will include the bootloader then any following updates can be done over serial.
In this example I am using an nRF52832 BLE module .
I have my UART to serial converter connected as follows:
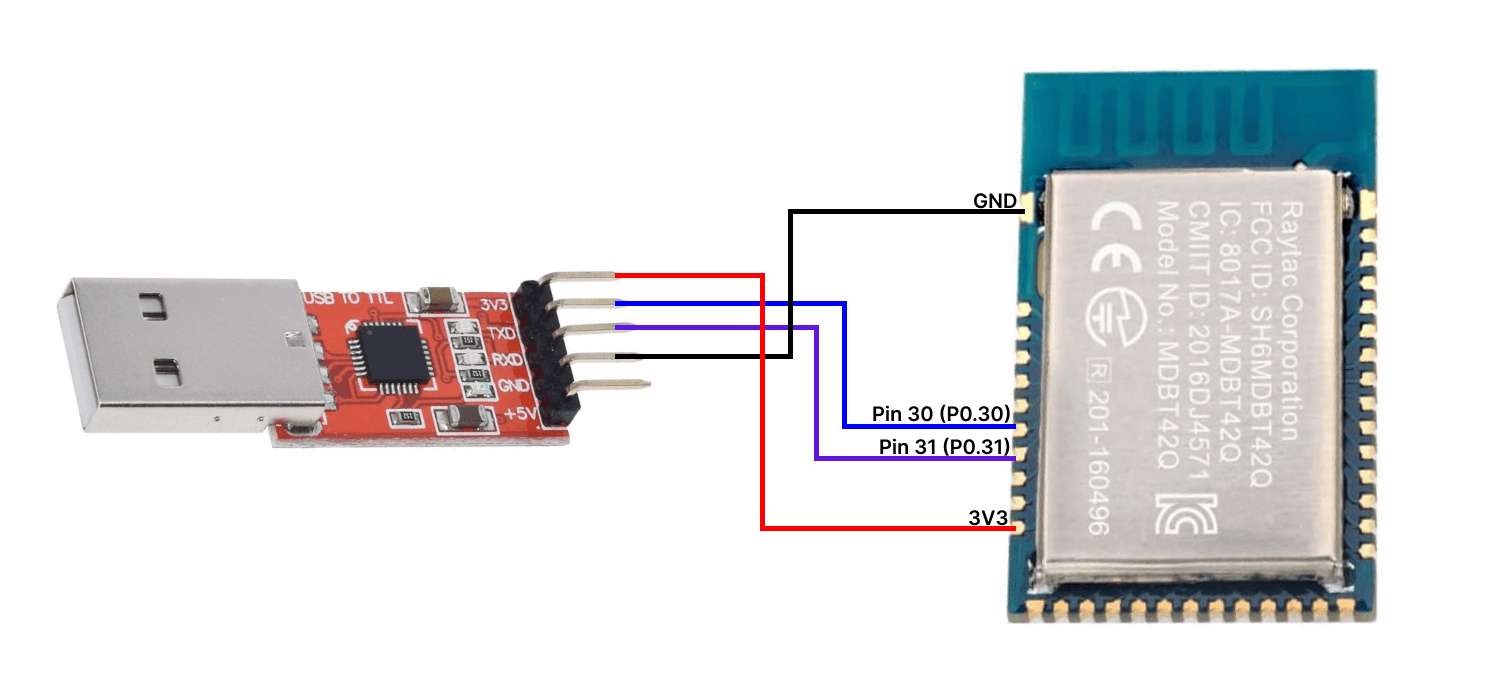
You can change this wiring as needed, but make sure to update the pin definitions where necessary.
We’ll be starting from the hello_world Zephyr example. In your new project open prj.conf and add the following line:
CONFIG_BOOTLOADER_MCUBOOT=yNext, create a /conf/mcuboot folder and add the following files:
mcuboot.confmcuboot.overlay.
In mcuboot.overlay add the following lines:
CONFIG_UART_CONSOLE=n
CONFIG_MCUBOOT_SERIAL=y
CONFIG_BOOT_SERIAL_UART=y

CONFIG_MCUBOOT_INDICATION_LED=y
CONFIG_BOOT_SERIAL_WAIT_FOR_DFU=y
CONFIG_BOOT_SERIAL_WAIT_FOR_DFU_TIMEOUT=5000

CONFIG_PARTITION_MANAGER_ENABLED=y
You can omit the CONFIG_MCUBOOT_INDICATION_LED entry if you do not plan on having an LED to indicate when your device is in bootloader mode.
You might also want to remove (or adjust) CONFIG_BOOT_SERIAL_WAIT_FOR_DFU and CONFIG_BOOT_SERIAL_WAIT_FOR_DFU_TIMEOUT. These values configure the amount of time your device will spend in “bootloader mode” before loading the main application.
If you are using a button to enter bootloader mode these entries might not be necessary. You can enter the main application immediately if a button press is not detected.
That’s it for bootloader specific Kconfigs.
Next open mcuboot.overlay to configure your board’s UART pins, bootloader button, and LED.
Add the following to mcuboot.overlay:
/ {
    buttons {
        compatible = "gpio-keys";
        button0: button_0 {
            label = "User Button";
            gpios = <&gpio0 29 (GPIO_ACTIVE_LOW | GPIO_PULL_UP)>;
        };
    };
    leds {
        compatible = "gpio-leds";
		led0: led_0 {
			gpios = <&gpio0 26 GPIO_ACTIVE_LOW>;
			label = "Red LED";
		};
    };
    aliases {
        mcuboot-button0 = &button0;
        mcuboot-led0 = &led0;
    };
};

&pinctrl {
	uart0_default: uart0_default {
		group1 {
			psels = <NRF_PSEL(UART_TX, 0, 20)>, <NRF_PSEL(UART_RX, 0, 19)>;
		};
	};
    uart0_sleep: uart0_sleep {
		group1 {
			psels = <NRF_PSEL(UART_TX, 0, 20)>, <NRF_PSEL(UART_RX, 0, 19)>;
			low-power-enable;
		};
	};
};

&uart0 {
    status = "okay";
    current-speed = <115200>;
    pinctrl-0 = <&uart0_default>;
    pinctrl-1 = <&uart0_sleep>;
    pinctrl-names = "default", "sleep";
};
The uart0 and &pinctrl entries configure the speed and specific pins for the UART controller.
You can see mcuboot-button0 and mcuboot-led0 aliased to button0 and led0. These entries are not strictly necessary depending on your application (especially if you are relying on CONFIG_BOOT_SERIAL_WAIT_FOR_DFU_TIMEOUT). However, I was getting some compile errors without them in older versions of Zephyr, your milage may vary.
Remember these pins are only used for the bootloader. They can be re-assigned for use in the main application.
Note if you are reusing the button0 pin in your main application and it is active during a reset, your device may boot into bootloader mode rather than into the main application.
Moving on… head over to CMakeLists.txt and add the following lines just above find_package(Zephyr REQUIRED HINTS $ENV{ZEPHYR_BASE}):
# MCUboot related
list(APPEND mcuboot_OVERLAY_CONFIG
  "${CMAKE_CURRENT_SOURCE_DIR}/conf/mcuboot/mcuboot.conf"
)
list(APPEND mcuboot_DTC_OVERLAY_FILE
  "${CMAKE_CURRENT_LIST_DIR}/conf/mcuboot/mcuboot.overlay"
)
This will tell your compiler where to find the configuration files for your bootloader image.
Once you build and flash this application you will be able to re-program your device from your UART to serial converter.
You will need the newtmgr CLI tool to do this.
Follow the installation instructions for your operating system on the mynewt website .
Once installed, run the following command.
newtmgr conn add myserialconn type=serial connstring="dev=/dev/tty.SLAB_USBtoUART,baud=115200"You can replace myserialconn with any value.
Make sure to replace connstring="dev=<your_converter> with the name of your UART to serial converter.
If you are unsure running ls -a /dev/* will help you identify the correct device.
Finally, running the following will start the bootloading process.
newtmgr -c myserialconn image upload build/zephyr/app_update.binNotice that it’s pointing to the app_update.bin file in your build folder.
If you run this command from a different location than your application source you should update this argument.
That’s it! You should now be able to program your devices running Zephyr with a UART to serial converter instead of using a dedicated programmer.
You can find the sample code in this repository .