How to Provision ESP32 WiFi Devices Using Soft AP and an E-Ink Display
At some point you’ll need to move away from hardcoding WiFi credentials in your firmware when working with WiFi enabled devices such as the ESP32. You will need to implement a process called “WiFi provisioning” which allows your users of your device to update the network settings. Luckily, Espressif provides a nice device provisioning library for us.
If you run the library’s provided example, you’ll notice it only prints the QR code on the serial terminal. This QR code is used by the ESP32 Soft AP app to quickly connect and set up the device’s network credentials.
This isn’t very useful for our end user unless you intend for them to always have your device plugged into their computer. Let’s make some modifications to the example code so the QR code is displayed to an e-ink display such as this one . We’ll be using an ESP32 feather as the main controller.
Displaying the WiFi Provisioner QR Code on an External Display
The full code can be found in the Github repository .
To begin, you’ll need to install a few libraries:
At the top of your sketch, include the new libraries:
#include "WiFiProv.h"
#include "WiFi.h"
#if __has_include("qrcode.h")
#include "qrcode.h"
#endif
#include "Adafruit_EPD.h"
Notice the call to __has_include("qrcode.h"). This should be included with WiFi.h, but let’s be explicit as we’ll be calling some functions directly from this library.
Next, define a few values that we’ll need throughout. The values preceded by EPD_ are specific to the Featherwing board I am using. Be sure to check these for your design.
#define EPD_DC 33
#define EPD_CS 15
#define EPD_BUSY -1 // can set to -1 to not use a pin (will wait a fixed delay)
#define SRAM_CS 32
#define EPD_RESET -1 // can set to -1 and share with microcontroller Reset!
#define EPD_SPI &SPI // primary SPI

#define COLOR1 EPD_BLACK
#define COLOR2 EPD_RED

#define DISPLAY_HEIGHT 250
#define DISPLAY_WIDTH 122
Initialize a few variables that will be used by the provisioning process. You should change the *pop and *service_name values to your own unique values. Note that clearProvisioningOnReset is set to true. This is useful for debugging, but would probably not be set in a real application.
const char *pop = "abcd1234";           // Proof of possession - otherwise called a PIN - string provided by the device, entered by the user in the phone app
const char *service_name = "PROV_123";  // Name of your device (the Espressif apps expects by default device name starting with "Prov_")
const char *service_key = NULL;         // Password used for SofAP method (NULL = no password needed)
bool clearProvisioningOnReset = true;
Create the display object and define an initializeDisplay function that we will call in setup. I’m rotating the display based on the needs for my project, but feel free to skip that line.
Adafruit_SSD1680 display(DISPLAY_HEIGHT, DISPLAY_WIDTH, EPD_DC, EPD_RESET, EPD_CS, SRAM_CS,
                         EPD_BUSY, EPD_SPI);

void initializeDisplay() {
  display.begin();
  display.setRotation(3);
  display.clearBuffer();
}
Now define a function that will write the QR code to the e-ink display. This is where the magic happens. We’ll eventually pass this function as a callback to a configuration object exposed by ESP32’s QR code library.
You can play with elementSize, padding, startingX, and startingY to adjust the location and size of the QR code on your screen.
The for loops iterate over each pixel in the QR code as defined by it’s size. Note: the QR code is always a square and esp_qrcode_get_size will the length of one leg of the square. We call esp_qrcode_get_module with the X and Y coordinates (the current location of our loop) to get a boolean that indicates if there should be a pixel drawn in that location. If true, we draw a rectangle for that pixel as big as the elementSize variable. This is done to scale the overall size of the QR code.
void displayProvisioningScreen(esp_qrcode_handle_t qrcode) {
  display.clearBuffer();
  esp_qrcode_print_console(qrcode);
  int size = esp_qrcode_get_size(qrcode);

  int elementSize = 3;
  int padding = 10;
  int startingY = (DISPLAY_HEIGHT / 2) - ((size * elementSize) / 2);
  int startingX = (DISPLAY_WIDTH / 2) - ((size * elementSize) / 2);

  for (int y = 0; y < size; y++) {
    for (int x = 0; x < size; x++) {
      if (esp_qrcode_get_module(qrcode, x, y)) {
        display.fillRect((x * elementSize) + startingX,
                         (y * elementSize) + startingY,
                         elementSize,
                         elementSize,
                         EPD_BLACK);
      } else {
        display.fillRect((x * elementSize) + startingX,
                         (y * elementSize) + startingY,
                         elementSize,
                         elementSize,
                         EPD_WHITE);
      }
    }
  }

  display.setCursor(0, 0);
  display.setTextSize(1);
  display.setTextColor(EPD_BLACK);
  display.setTextWrap(true);
  display.print("Scan the QR code to connect this device to a WiFi network!");

  display.display();
}
Moving on, we define a function to log the current state of the provisioning process. This will be passed in during initialization of the provisioner. Right now it doesn’t server any purpose other than to help debug. But, it could be modified to update the application’s state based on the user’s provisioning progress.
// WARNING: systemProvisionerEvt is called from a separate FreeRTOS task (thread)!
void systemProvisionerEvt(arduino_event_t *sys_event) {
  switch (sys_event->event_id) {
    case ARDUINO_EVENT_WIFI_STA_GOT_IP:
      Serial.print("\nConnected IP address : ");
      Serial.println(IPAddress(sys_event->event_info.got_ip.ip_info.ip.addr));
      break;
    case ARDUINO_EVENT_WIFI_STA_DISCONNECTED:
      Serial.println("\nDisconnected. Connecting to the AP again... ");
      break;
    case ARDUINO_EVENT_PROV_START:
      Serial.println("\nProvisioning started\nGive Credentials of your access point using smartphone app");
      break;
    case ARDUINO_EVENT_PROV_CRED_RECV:
      {
        Serial.println("\nReceived Wi-Fi credentials");
        Serial.print("\tSSID : ");
        Serial.println((const char *)sys_event->event_info.prov_cred_recv.ssid);
        Serial.print("\tPassword : ");
        Serial.println((char const *)sys_event->event_info.prov_cred_recv.password);
        break;
      }
    case ARDUINO_EVENT_PROV_CRED_FAIL:
      {
        Serial.println("\nProvisioning failed!\nPlease reset to factory and retry provisioning\n");
        if (sys_event->event_info.prov_fail_reason == WIFI_PROV_STA_AUTH_ERROR)
          Serial.println("\nWi-Fi AP password incorrect");
        else
          Serial.println("\nWi-Fi AP not found....Add API \" nvs_flash_erase() \" before beginProvision()");
        break;
      }
    case ARDUINO_EVENT_PROV_CRED_SUCCESS:
      Serial.println("\nProvisioning Successful");
      break;
    case ARDUINO_EVENT_PROV_END:
      Serial.println("\nProvisioning Ends");
      break;
    default:
      Serial.print("\nUnhandled event: ");
      Serial.println(sys_event->event_id);
      break;
  }
}
Finally, we define the initializer function. The last couple of lines will generate a JSON payload that we encode into the QR code. This is the format necessary to use the ESP32 WiFi provisioning app. Notice that we pass our displayProvisioningScreen to cfg.display_func. This is the function that will be called when the QR code is ready to be displayed by the provisioning library. In our case, it draws the QR code to the display.
void initializeWifiProvisioner() {
  WiFi.onEvent(systemProvisionerEvt);
  Serial.println("Begin Provisioning using Soft AP");

  WiFiProv.beginProvision(WIFI_PROV_SCHEME_SOFTAP,
                          WIFI_PROV_SCHEME_HANDLER_NONE,
                          WIFI_PROV_SECURITY_1,
                          pop,
                          service_name,
                          service_key,
                          NULL,
                          clearProvisioningOnReset);  // Reset provisioning each time the device resets

  char payload[150] = { 0 };
  snprintf(payload, sizeof(payload), "{\"ver\":\"%s\",\"name\":\"%s\""
                                     ",\"pop\":\"%s\",\"transport\":\"%s\"}",
           "v1", service_name, pop, "softap");
  esp_qrcode_config_t cfg = ESP_QRCODE_CONFIG_DEFAULT();
  cfg.display_func = displayProvisioningScreen;
  esp_qrcode_generate(&cfg, payload);
}
Define the setup function and let it run! Nothing is needed in the loop function for this example.
void setup() {
  Serial.begin(115200);
  initializeDisplay();
  initializeWifiProvisioner();
}
Testing the Provisioning Process
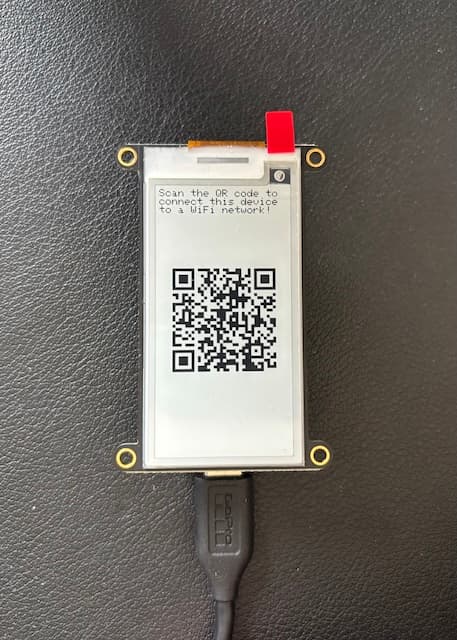
Here’s what your display should show when ready for provisioning to begin:
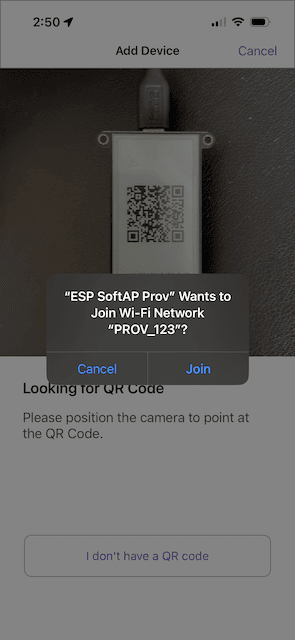
And when you start your ESP32 Soft AP app and point your phone’s camera at the QR code on the display, you should be prompted to connect to your ESP’s access point to start the provisioning process.
The full code for this sample can be found in the Github repository .