Getting started with Flutter Reactive Bluetooth Low Energy.
Sep, 21 2021
Flutter and Bluetooth have a lot of promise. The idea of being able to develop one code base to target all mobile platforms for your wireless projects goes a long way to further the dream of a one person fullstack IoT developer.
A new Bluetooth library just launched in August: Reactive BLE. Let's take a look at how to get it up and running.
One thing to note here is that you will need a physical device to debug Bluetooth projects. The simulators (both iOS and Android) don't yet support your computer's Bluetooth connections.
Start with a new Flutter project and delete everything in main.dart. Replace the contents with the following:
import 'package:flutter/material.dart';

void main() {
  return runApp(
    const MaterialApp(home: HomePage()),
  );
}

class HomePage extends StatefulWidget {
  const HomePage({Key? key}) : super(key: key);

  @override
  _HomePageState createState() => _HomePageState();
}

class _HomePageState extends State<HomePage> {
  @override
  Widget build(BuildContext context) {
    return Scaffold(
			backgroundColor: Colors.white,
			body: Container(),
		);
  }
}
We should just see a blank screen after we start debugging.
Next, let's add some buttons to interact with our Bluetooth device. Update the _HomePageState build method with the following:
class _HomePageState extends State<HomePage> {
  @override
  Widget build(BuildContext context) {
    return Scaffold(
			backgroundColor: Colors.white,
			body: Container(),
			persistentFooterButtons: [
        ElevatedButton(
          style: ElevatedButton.styleFrom(
            primary: Colors.grey, // background
            onPrimary: Colors.white, // foreground
          ),
          onPressed: () {},
          child: const Icon(Icons.search),
        ),
				ElevatedButton(
          style: ElevatedButton.styleFrom(
            primary: Colors.grey, // background
            onPrimary: Colors.white, // foreground
          ),
          onPressed: () {},
          child: const Icon(Icons.bluetooth),
        ),
        ElevatedButton(
          style: ElevatedButton.styleFrom(
            primary: Colors.grey, // background
            onPrimary: Colors.white, // foreground
          ),
          onPressed: () {},
          child: const Icon(Icons.celebration_rounded),
        ),
      ],
		);
  }
}
You can see we added the persistentFooterButtons property of the Scaffold widget and filled it with a list of ElevatedButtons.
Your device should now have some buttons. They won't do anything just yet, though.

Now we should pull in our Bluetooth library Run the installation command in your project's terminal:
flutter pub add flutter_reactive_ble
Then, import the library at the top of your main.dart file:
import 'package:flutter_reactive_ble/flutter_reactive_ble.dart';
❗️ Read below for iOS development ❗️
Before running our project with the bluetooth library imported, we need to change a few project settings.
Head to ios/Podfile and find this line up top:

Uncomment it and change the platform to 12.0
platform :ios, '12.0'
Next, let's head over to ios/Runner/Info.plist and add these two lines just before the closing </dict> tag:
<key>NSBluetoothAlwaysUsageDescription</key>
<string>The app uses bluetooth to find, connect and transfer data between different devices</string>
<key>NSBluetoothPeripheralUsageDescription</key>
<string>The app uses bluetooth to find, connect and transfer data between different devices</string>
❗️ Read below for Android development ❗️
Before running our project with the bluetooth library imported, we need to change a few project settings.
Head over to android/app/build.gradle and find the defaultConfig object. (around line 44)
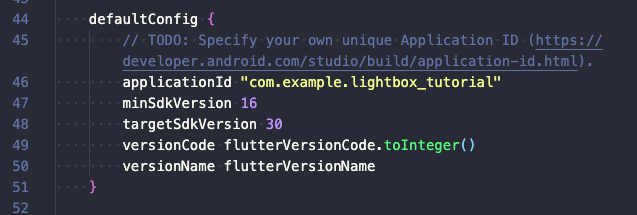
Change the minSdkVersion to 21:
minSdkVersion 21
🔥 Back to cross platform development 🔥
We have a few more permissions details to sort out before we can start scanning for Bluetooth devices.
In your ./pubspec.yaml file, add the locations permissions package in the dependancies field.
location_permissions: ^4.0.0
By now, here are all of the import statements your ./main.dart file should contain
import 'dart:async';
import 'dart:io' show Platform;

import 'package:location_permissions/location_permissions.dart';
import 'package:flutter/material.dart';
import 'package:flutter_reactive_ble/flutter_reactive_ble.dart';
In our _HomePageState class, let's add some variables that we can use to handle the Bluetooth activity.
// Some state management stuff
  bool _foundDeviceWaitingToConnect = false;
  bool _scanStarted = false;
  bool _connected = false;
// Bluetooth related variables
  late DiscoveredDevice _ubiqueDevice;
  final flutterReactiveBle = FlutterReactiveBle();
  late StreamSubscription<DiscoveredDevice> _scanStream;
  late QualifiedCharacteristic _rxCharacteristic;
// These are the UUIDs of your device
  final Uuid serviceUuid = Uuid.parse("75C276C3-8F97-20BC-A143-B354244886D4");
  final Uuid characteristicUuid = Uuid.parse("6ACF4F08-CC9D-D495-6B41-AA7E60C4E8A6");
Under these variable definitions, add a new function to handle the scanning activity named _startScan()
void _startScan() async {
// Platform permissions handling stuff
    bool permGranted = false;
    setState(() {
      _scanStarted = true;
    });
    PermissionStatus permission;
    if (Platform.isAndroid) {
      permission = await LocationPermissions().requestPermissions();
      if (permission == PermissionStatus.granted) permGranted = true;
    } else if (Platform.isIOS) {
      permGranted = true;
    }
// Main scanning logic happens here ⤵️
    if (permGranted) {
      _scanStream = flutterReactiveBle
          .scanForDevices(withServices: [serviceUuid]).listen((device) {
        // Change this string to what you defined in Zephyr
        if (device.name == 'UBIQUE') {
          setState(() {
            _ubiqueDevice = device;
            _foundDeviceWaitingToConnect = true;
          });
        }
      });
    }
  }
We'll use the two packages we just imported to ensure that proper permissions is given by the user.
iOS should handle this natively, where as with Android we need special handling.
Thanks to wolfc01 for this example.
In the if(permGranted) block is where we'll be adding the scanning logic.
Next, we need to define a function _connectToDevice() to establish a connection after we've found our intended device:
void _connectToDevice() {
    // We're done scanning, we can cancel it
    _scanStream.cancel();
    // Let's listen to our connection so we can make updates on a state change
    Stream<ConnectionStateUpdate> _currentConnectionStream = flutterReactiveBle
        .connectToAdvertisingDevice(
            id: _ubiqueDevice.id,
            prescanDuration: const Duration(seconds: 1),
            withServices: [serviceUuid, characteristicUuid]);
    _currentConnectionStream.listen((event) {
      switch (event.connectionState) {
        // We're connected and good to go!
        case DeviceConnectionState.connected:
          {
            _rxCharacteristic = QualifiedCharacteristic(
                serviceId: serviceUuid,
                characteristicId: characteristicUuid,
                deviceId: event.deviceId);
            setState(() {
              _foundDeviceWaitingToConnect = false;
              _connected = true;
            });
            break;
          }
        // Can add various state state updates on disconnect
        case DeviceConnectionState.disconnected:
          {
            break;
          }
        default:
      }
    });
}
Please note that this method of state handling is very messy.
Reactive BLE returns nice streams that you should be subscribing to to handle state change, but for the purpose of this post we'll just be using the setState() call.
This last function is for me, I developed a Bluetooth light display that has a _partyTime() call 😎
void _partyTime() {
    if (_connected) {
      flutterReactiveBle
          .writeCharacteristicWithResponse(_rxCharacteristic, value: [
        0xff,
      ]);
    }
  }
Change this to suite your device, or check out the guide on how I built mine.
Now we need to add some functionality to our footer buttons to run the logic we just implemented.
Replace the list of persistentFooterButtons in your Scaffold widget with the following:
persistentFooterButtons: [
        // We want to enable this button if the scan has NOT started
        // If the scan HAS started, it should be disabled.
        _scanStarted
            // True condition
            ? ElevatedButton(
                style: ElevatedButton.styleFrom(
                  primary: Colors.grey, // background
                  onPrimary: Colors.white, // foreground
                ),
                onPressed: () {},
                child: const Icon(Icons.search),
              )
            // False condition
            : ElevatedButton(
                style: ElevatedButton.styleFrom(
                  primary: Colors.blue, // background
                  onPrimary: Colors.white, // foreground
                ),
                onPressed: _startScan,
                child: const Icon(Icons.search),
              ),
        _foundDeviceWaitingToConnect
            // True condition
            ? ElevatedButton(
                style: ElevatedButton.styleFrom(
                  primary: Colors.blue, // background
                  onPrimary: Colors.white, // foreground
                ),
                onPressed: _connectToDevice,
                child: const Icon(Icons.bluetooth),
              )
            // False condition
            : ElevatedButton(
                style: ElevatedButton.styleFrom(
                  primary: Colors.grey, // background
                  onPrimary: Colors.white, // foreground
                ),
                onPressed: () {},
                child: const Icon(Icons.bluetooth),
              ),
        _connected
            // True condition
            ? ElevatedButton(
                style: ElevatedButton.styleFrom(
                  primary: Colors.blue, // background
                  onPrimary: Colors.white, // foreground
                ),
                onPressed: _partyTime,
                child: const Icon(Icons.celebration_rounded),
              )
            // False condition
            : ElevatedButton(
                style: ElevatedButton.styleFrom(
                  primary: Colors.grey, // background
                  onPrimary: Colors.white, // foreground
                ),
                onPressed: () {},
                child: const Icon(Icons.celebration_rounded),
              ),
      ],
Now when we have our Bluetooth device plugged in and within range, we can press the search button to start a scan.
Then the Bluetooth button becomes enabled to connect after our app discovers the device.

Note that if you start the scan while your device is out of range or off, it will just keep scanning until the device is discovered.
Check out the full Github repository here.